


The Resurfacing Process
Terminology
You may have encountered several different terms referring to the process of bath and bathroom resurfacing. Please note that all the various terms used to refer to resurfacing are in all major respects the same process:
Resurfacing = Refinishing = Re-glazing = Re-enameling
The differences that do exist lie with the methods and materials used in surface preparation, priming and top coating, but these differences are not ascribed to any particular term above.
The terms 're-enameling', 'synthetic porcelain' and 'thermal fusion' can be misleading as they infer that a process involving kiln temperatures is employed in the bathroom, which simply isn't the case. Using such terms may also suggest that the refinished surface is the same as original porcelain or vitreous enamel, which it isn't.
Resurfacing is a multi-step procedure
Applicators using Classic Surface by Worldwide Refinishing Systems follow detailed, step-by-step procedures to ensure a professional finish and long term durability.
There are differences when resurfacing different surface materials and different fixtures, but the basic steps are the same. The following example illustrates the main steps in the resurfacing of a built-in, porcelain coated cast iron bath tub:
|
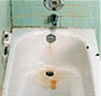
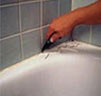
STEP 1 - Before Cast-iron and steel tubs with porcelain surfaces and vitreous enamel surfaces can become thin and porous over time, absorbing soap, body oils and cleaners. This leads to pin holes, rust, chips and exposed metal areas. Molded acrylic fibreglass tubs on the other hand can crack when the acrylic skin has worn very thin. Everyday wear and tear can chip and scratch any surface, including baths, basins, toilets and cabinets. |
 |
|
STEP 2 - Trim Caulk Existing caulk is removed to allow resurfacing to extend under the tiles. If the subsurface behind the wall is damp, it is dried out before resurfacing. |
 |
|
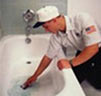
STEP 3 - Clean the surface The surface is thoroughly cleaned, removing grease, soap residues and other contaminants from the surface. |
 |
|
STEP 4 - Surface Etching A controlled surface etch is used to create a stable, uncontaminated micro-porosity which is excellent for enabling the bonding agent system that follows to achieve a very high bond strength. |
 |
|
STEP 5 - Chip Repair Chips and cracks are repaired with either a blended epoxy resin requiring heat cure or a fast cure, polyester filler. The epoxy system is designed for use on mineral surfaces such as porcelain and vitreous enamel, and the polyester system is use on synthetic materials such as Acrylic. |
 |
|
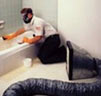
STEP 6 - Masking The entire area is prepared for treatment. Skilful masking ensures that the coating system is only applied to the surfaces that are being resurfaced, with all other areas protected from overspray.; |
 |
|
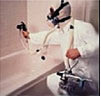
STEP 7 - Spraying Bonding Agent A non-hygroscopic bonding agent primer provides the bond between surface and top coating. An evacuation unit is used to remove any solvent smells during the spray application procedures. The Classic Surface resurfacing system derives its superior adhesion from both a mechanical and chemical bond. |
 |
|
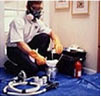
STEP 8 - Preparing to Spray The Classic Surface coating is activated and allowed to catalyze for at least 30 minutes prior to spraying. More details about Classic Surface are available here. |
 |
|
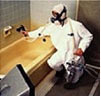
STEP 9 - Spraying the Coating Three coats of the Classic Surface coating are then applied, with an average wet film thickness of approx. 75 microns per coat. The procedures followed and the remote pressure pot system used by WRS applicators ensure that a very smooth finish and uniform dry film thickness are achieved. |
 |
|
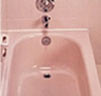
STEP 10 - After After drying and curing, your bathroom will have a whole new look. The chips, scratches and rust have disappeared and in their place is a tough, shining surface that is easy to clean and capable of lasting for many years* at a fraction of the cost of total replacement. * Expected life span of the surface is determined by usage and cleaning. Abrasive cleaning, chemical attack and accidental chipping/ gouging of the surface will shorten the life. |
 |
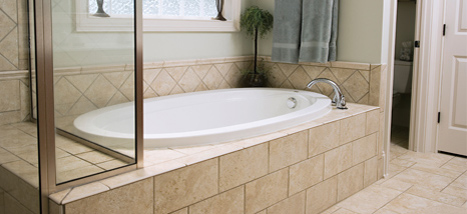
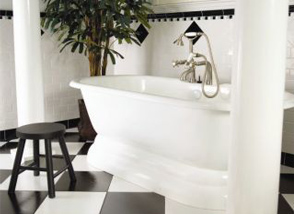
What can be Resurfaced?
Resurfacing is an efficient and flexible renovating method that can transform any of the following fixtures with minimal disruption and downtime:
| . Bath tubs | . Shower Trays | . Benchtops |
| . Bath Surrounds | . Wall Tiles | . Floor Tiles* |
| . Clawfoot Baths | . Pedestal Basins | . Bathroom Fixtures |
| . Spa Baths | . Vanity tops | . Fixtures |
* Epoxy and Urethane floor coatings are not as hard as the glass hard, kiln fired finish on floor tiles, so loss of gloss will occur more quickly in doorways and other areas of heavy foot traffic. Floor tile resurfacing is not available in all serviced areas.
